Set up StagingLens once and you're ready to stage. Most people are done in about ten minutes.
1Install StagingLens
2Create an OpenAI API key
3Set up API billing
4Add your key in Settings
Install StagingLens
Open your purchase receipt email and download StagingLens for Mac or Windows.
Windows: the download is a ZIP file, not an installer. Extract the entire ZIP to a permanent folder, then open StagingLens\StagingLens.exe. Keep the executable and all of its supporting files together; don't move StagingLens.exe out of its folder on its own.
Mac: open the downloaded file and drag StagingLens into your Applications folder.
Open StagingLens. If you're asked for a license key, copy it from your Creem receipt email. You can also find it by signing in from your Account page.
No separate .NET installation or developer tools are required. See a security warning when opening the app? Check Security warning on opening.
Create your OpenAI API key
Your API key connects StagingLens to your own OpenAI account. You only need to do this once.
Open API keys. If you don't land there automatically, choose API keys in the sidebar.
Click "Create new secret key." Name it something you'll recognize, like "StagingLens."
Copy the key right away. OpenAI may only show the full key once.
Helpful tip: your key usually begins with sk-. Keep it private and don't share it with anyone.
Set up OpenAI API billing
This is the step most people miss. ChatGPT Plus and OpenAI API billing are separate. A ChatGPT Plus or Pro subscription doesn't include API credits, so StagingLens can't generate images until your API account has its own payment method or credits.
Review OpenAI's usage limits and budget settings. Budget alerts notify you about spending; don't rely on them as a guaranteed hard cap. Image costs vary with the model, settings and number of attempts.
Make sure your project's spending limit isn't set to $0.
OpenAI may require account or organization verification before image generation is available. If OpenAI prompts you to verify your organization or identity, complete that process in your OpenAI Platform account before using StagingLens.
Add your key to StagingLens
Open StagingLens and click Settings.
Find OpenAI image generation and expand Connection settings and help.
Paste your key into the OpenAI API key field.
Click Save Key. The key isn't used until it's saved.
Click Test Connection. A saved key and a verified connection have separate status messages.
Test Connection confirms that OpenAI accepts your key. It doesn't confirm that your account is funded or has access to every image-generation operation, so your first generation is the final check. Your key is stored on your computer and is only sent to OpenAI.
Staging photos
The built-in staging rules handle most rooms on their own. Adjust any photo only when it needs something specific.
Projects and importing photos
Create a project for each listing. Type a clear name, like the property address, and click Create Project.
Click Import Photos and choose the listing photos you want to stage, or drop them onto the project. JPG, JPEG, PNG and WEBP files are supported, and your original files are never modified.
Each photo appears as a card in the project grid.
Use Projects in the top-left corner to switch between listings.
Staging controls
Two kinds of selection work together:
The active photo is the one you click. Its settings appear in the right-hand panel, and changes there apply to that photo.
Checked photos are the ones whose thumbnail box is ticked. Checkboxes decide which photos Generate Selected, Regenerate checked photos and Export Selected act on. Clicking a photo doesn't check it.
For interiors, the right-hand panel shows these controls. Some appear only for certain tasks; for example, Declutter keeps the existing furniture and hides the styling options.
Room
Living / Family Room, Bedroom, Kitchen, Bathroom, Patio / Outdoor, Pool and more, so the result fits the space. Exterior Sunset is also here; see Exterior Sunset.
Task
Stage Empty Room, Declutter + Stage, or Declutter.
Look
Style, like Modern, Coastal or Luxury contemporary, and Color, a palette such as Warm neutral or Soft green.
Artwork
The wall-art approach. Do Not Change preserves existing artwork and leaves bare walls bare.
Instructions Optional
Notes for this photo only, like "family room on right, dining on left; keep existing couch."
Changing a setting doesn't generate an image. If a photo already has a result, the panel shows "Settings changed — regenerate to apply."
Generate and review
Check the thumbnail boxes for the photos you want to generate, or click Select All.
Click Generate Selected. The number on the button counts checked photos that don't have a result yet; checked photos that already have one are skipped. To generate only the active photo, use Generate in the right-hand panel.
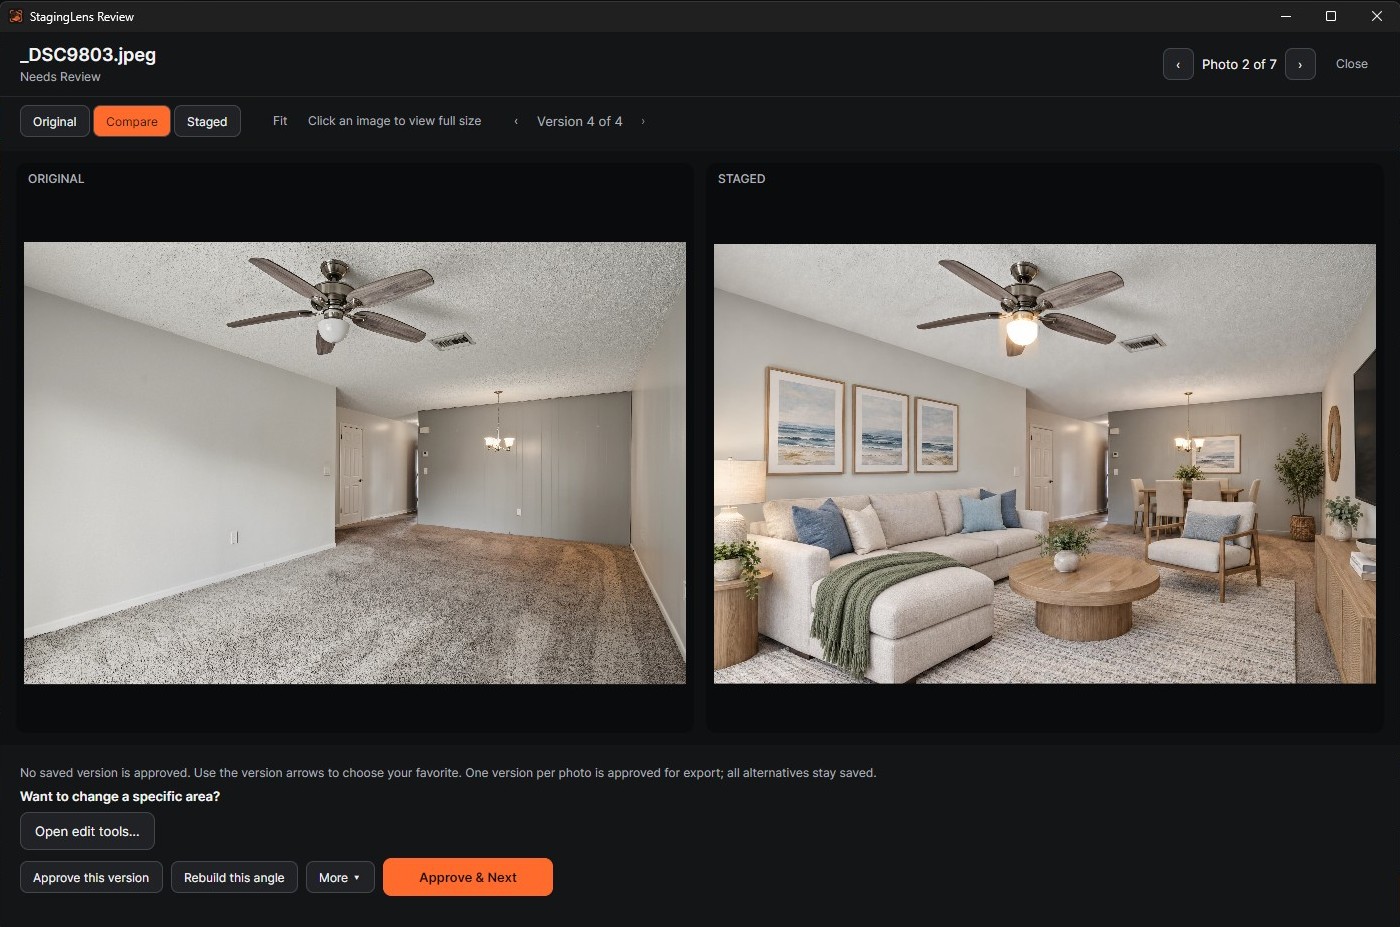
Open Review beneath a finished photo. Switch between Original, Compare and Staged, zoom in to inspect details, and use Fit to see the whole image.
Browse saved versions with the version arrows. The photo arrows move to the previous or next photo.
Approve the version you want with Approve this version, or use Approve & Next to approve it and move to the next photo.
Need a change? To correct one area, click Open edit tools…; see Make a specific change to a staged photo. For a fresh result from the original photo, click Rebuild this angle. Every attempt is kept as a saved version.
Changed your mind? Use Remove approval on an approved result.
The More menu beside Generate Selected also has Generate all unfinished photos, which generates every photo in the project that doesn't have a result yet. It doesn't regenerate finished photos.
Each generation, rebuild or local edit is a separate paid OpenAI image request. Approving a version doesn't generate an image.
Make a specific change to a staged photo
Happy with the room but want to change one detail? Open the edit tools to select an area and describe the correction.
Choose the version to edit. Open Review and use the version arrows to display the staged version you want to change.
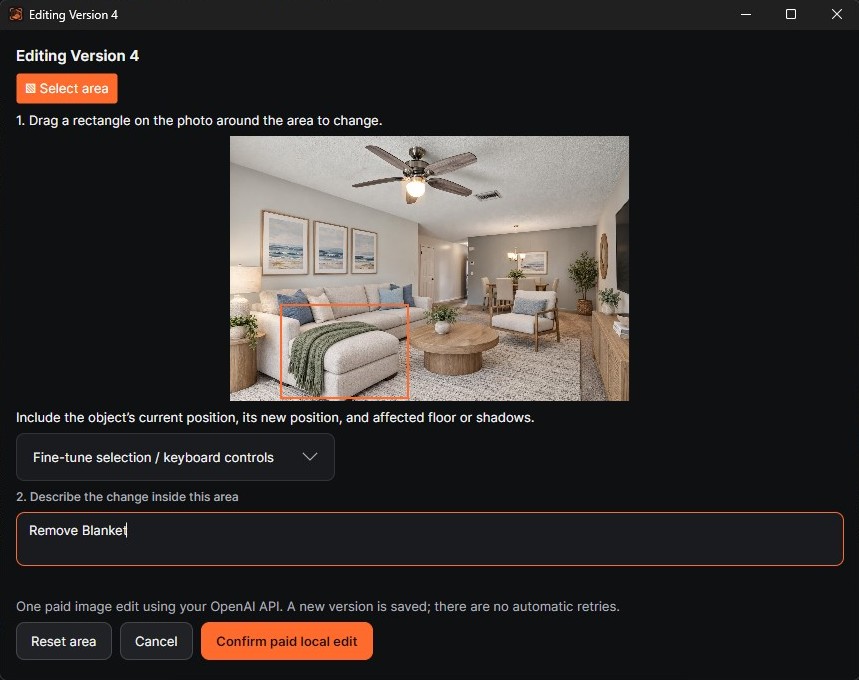
Open the editor. Click Open edit tools… beneath "Want to change a specific area?" The editor heading identifies the selected version, for example "Editing Version 4."
Choose your saved version, then click Open edit tools… to make a specific correction. On a phone, swipe the screenshot sideways to see the whole window. View full size
Select the area. Click Select area and drag a rectangle around the area you want to change.
For blanket removal, include the entire blanket and a little of the surrounding sofa upholstery so the edit can reconstruct the exposed surface. To move an object, include its current position, its intended new position, and the affected floor or shadows.
To adjust the selection, use Reset area to start again, or expand Fine-tune selection / keyboard controls. If the app reports that the selection is too narrow, enlarge it before continuing.
A local edit can cover up to 80% of the photo. For whole-room changes, use Rebuild this angle instead.
Describe the change. Type it in the field beneath "Describe the change inside this area." The screenshot shows "Remove Blanket." A more specific instruction usually works better:
Example: Remove the green blanket from the chaise. Restore matching sofa upholstery underneath and keep the sofa's shape and position unchanged.
Select the blanket and surrounding upholstery, then describe what to remove. This screenshot shows the edit before submission. On a phone, swipe the screenshot sideways to see the whole window. View full size
Submit the edit. Click Confirm paid local edit. This sends one paid image-edit request using your OpenAI API account. There are no automatic retries. Cancel closes the editor without submitting this edit.
Review the new version. The app saves the result as a new, unapproved version. Inspect it, then use Approve this version or Approve & Next if you're satisfied. Previous saved versions and existing approvals remain available.
Local editing starts from the staged version you selected. StagingLens blends the edited area into that image while preserving the image outside the selection. Check the edited area for natural upholstery, shadows, edges and placement before approving.
Results vary, and an edit can fall short of what you asked for. Repeated edits can reduce quality inside the edited area, so keep an earlier version if a later one looks worse.
Open edit tools… or Rebuild this angle?
Open edit tools…
Make a specific correction to the selected staged version. Only the area you select is edited.
Rebuild this angle
Create a fresh result from the original photograph using the photo's current staging settings. It's a separate paid image request, saved as a new version.
Regenerate checked photos
The right-hand panel has a separate Regenerate with current settings action for the highlighted photo. Review the confirmation before proceeding. It does not use the checkbox selection.
To create new versions of photos that already have results, check those photos, then choose Regenerate checked photos from the More menu beside Generate Selected.
It works on the checked photos, not the photo you've clicked. A highlighted photo that isn't checked won't regenerate.
Checked photos without a result are skipped. Use Generate Selected for those.
Before anything starts, a confirmation lists how many photos and which files will regenerate. It explains that new versions use your current settings, incur image-generation charges, and that existing versions stay saved.
Click Regenerate to continue. Cancel, or closing the dialog, generates nothing.
Reset staging and restore saved versions
Reset staging to original clears the current preview and approval without deleting the original or saved versions. Choose Show saved versions to return to those alternatives. Resetting does not generate an image.
Work with several photos
Select All and Clear Selection check or uncheck every photo in the project.
Batch style applies one look to many photos: Furniture style, Color palette, Artwork style and optional furniture materials and shapes. Tick Apply only to checked rooms to limit it to checked photos, then click Apply style. You can also save the look as a collection, or make it your default for new projects.
Batch style doesn't change Room or Task, and it doesn't generate images. Saved versions are kept; regenerate the photos to apply the new look.
The Project menu includes Approve checked photos and Approve all generated photos. Review each result before approving it this way.
Stage multiple angles of the same room Beta
Group photos of the same room so an approved primary design can guide the staging of additional views. Each photo keeps its own viewpoint, and every result needs your review.
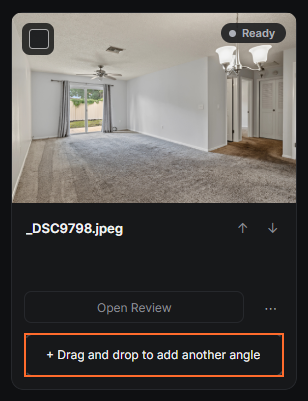
Add another angle. Import the room's photos into the project. Then drag another photo of the same physical room from the project grid onto + Drag and drop to add another angle on the photo you want as the primary. A room can have up to four views: the primary and up to three additional views. Each added view copies the primary's staging settings.
The drop area works by drag and drop only. Clicking it doesn't open a file picker. To group several photos at once, check 2–4 photos of the same room and click Group checked as room. The active checked photo becomes the primary; otherwise the first checked photo is used.
Drag another photo of the same room onto the highlighted drop area. View full size
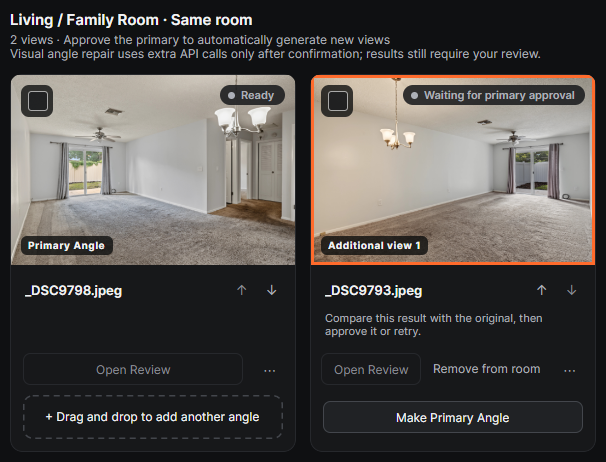
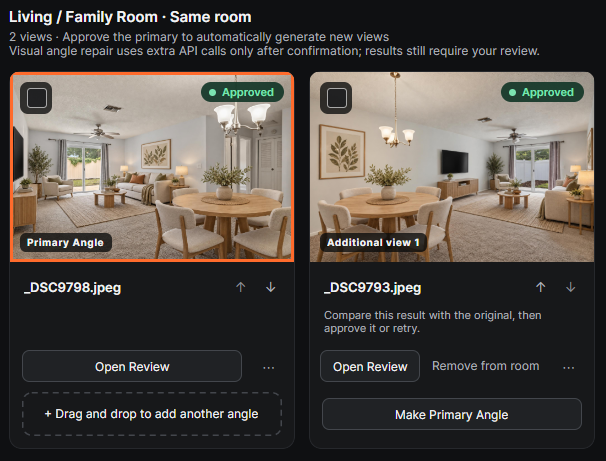
Choose the primary angle. The card labeled Primary Angle supplies the main design for the room. Choose a clear view that shows the main furniture area and important architectural features. An additional view has a Make Primary Angle action, and Remove from room remains available to take it out of the group; both photos and their saved versions are kept.
The additional view waits until the primary design has been generated and approved. On a phone, swipe the screenshot sideways to see both cards. View full size
Generate and approve the primary design. Check the primary photo and click Generate Selected, or use Generate in the right-hand panel. Additional views show "Waiting for primary approval" and aren't generated yet.
Cost: Approving the primary design can start additional paid image requests for the other views. OpenAI bills these separately.
Open Review, compare the result with the original, and approve the saved version you want with Approve this version or Approve & Next. Approving the primary automatically starts generating each additional view in the room that doesn't have a result yet; there's no further confirmation. Views that already have results aren't regenerated, and automatic generation never approves anything. If you add a view to a room whose primary is already approved, that view starts generating right away.
Review each additional view. Open Review for each result and compare it with its original and the primary design. Check furniture identity, placement, orientation, scale, doors, windows and walkways. Approve only results you're satisfied with.
Review and approve each view separately. Approved labels identify saved approvals; they do not guarantee that the angles match perfectly. On a phone, swipe the screenshot sideways to see both cards. View full size
Correct a specific detail. Use Open edit tools… to correct a selected area of one saved staged version; see Make a specific change to a staged photo. Editing one view doesn't automatically make the same correction in the other views. For an additional view that already has a result, Rebuild this angle opens visual angle repair, which uses extra API calls only after you confirm. Rebuilding and local editing are separate paid actions.
What to expect: Multi-angle staging uses an approved primary design to guide additional views. Furniture placement, orientation and details can differ between images. Compare every angle before delivery; corrections or additional paid attempts may be needed.
Why is multi-angle staging in beta?
Matching a furnished room across different camera angles remains a challenging task for generative AI. Producing a convincing individual image is different from maintaining the exact same furniture, positions and orientations across several viewpoints.
StagingLens uses your approved primary design to guide additional angles, but it does not guarantee a geometrically consistent 3D reconstruction of the room. Furniture may move, rotate, change or disappear between views.
We label this feature Beta because those results are not yet consistently reliable. Review every angle together before delivery. Local edits can help correct individual details, but additional paid attempts may be needed and a satisfactory match is not guaranteed.
Changing the primary angle
Choose the primary before generating additional views when possible. If you click Make Primary Angle later, the app asks you to confirm. The chosen photo becomes the room's design reference, approvals on the other views are removed, and all originals and saved versions are kept. Nothing is generated or charged by the change itself.
Approve the new primary design before generating more views. Views without a result then generate automatically. Saved results made from the earlier design show "Room reference changed — review saved result"; review them against the new primary before approving.
Approve and export
Review is for comparing, browsing saved versions, approving and revising. There's no Export action inside Review. Close Review and export from the main workspace:
Export Selected, inside Export Options, exports the checked photos that have a generated result. The number on the menu item counts only those photos; checked photos without a result aren't exported.
The Export Options menu in the bottom bar has Export approved images, which exports the approved version of each approved photo, and Export all generated images.
In Export & Disclosure, choose the destination folder, the image label and the filename suffix. Then tick "I have confirmed the disclosure requirements for this listing" and click Export Images.
Images export as JPG files with your suffix added, for example IMG_1234_STAGED.jpg. A photo that's still generating can't be exported until it finishes.
Disclosure overlays and format conversion may remove embedded Content Credentials. Keep the original generated files if you need their provenance metadata. Check the exported image dimensions against your listing platform's requirements.
Lightroom Classic round trip
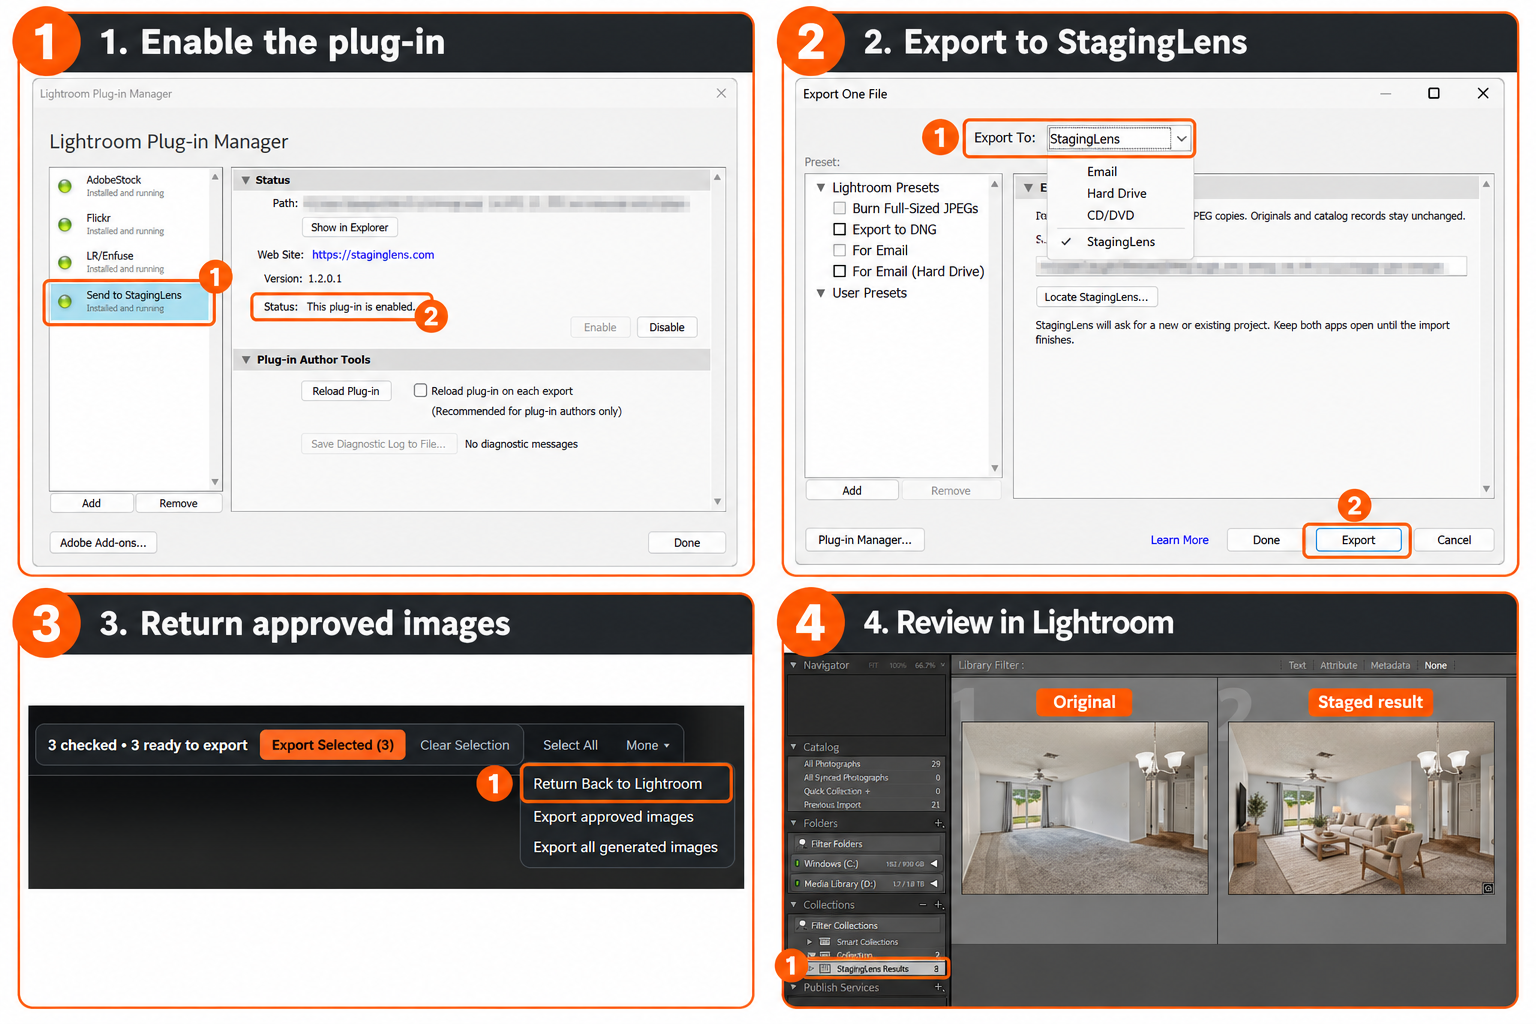
Install the included SendToStagingLens.lrplugin folder using Lightroom Classic’s File → Plug-in Manager → Add. Keep the whole folder in a permanent location. When updating, disable the old plug-in and add the matching new copy. Lightroom cloud is not supported.
Select photos in Lightroom Classic. Choose File → Export, then Export To → StagingLens. If needed, use Locate StagingLens…. On Windows choose StagingLens\current\StagingLens.exe inside the extracted package. On Mac choose the installed StagingLens app.
Import into a StagingLens project, generate, compare results and choose versions.
Open Export Options → Send to Lightroom…. Choose the version scope, confirm the destination catalog and disclosure, then send. Explicit sends may include unapproved versions; check your selection carefully.
For photos originally sent by the plug-in, Automatically return new approvals… enables approval-only return to the originating catalog. Direct imports can use the explicit Send to Lightroom option.
Keep Lightroom Classic open with the destination catalog selected. Results appear as separate photos in StagingLens Results; original photos and Lightroom edits remain unchanged. Import usually takes less than a minute but may take 1–2 minutes. There is no need to send again while waiting. Each intentional repeat send creates new copies; reprocessing the same return bundle does not duplicate it.
Starting with Windows 0.6.46, a dismissible Sent to Lightroom Classic notice appears after the transfer is queued. It changes to Imported into Lightroom Classic only when the plug-in confirms completion.
Earlier Windows screenshots show plug-in setup and the results collection. Current export commands are listed above; older screenshots may show the former More menu.
Tips for best results
Start with a good photo. Straight verticals, even exposure and a sharp image give the best staging.
Set the right room type. It has the biggest effect on what gets placed in the room.
Use a short instruction for tricky rooms. Say where things go, like "sofa facing the fireplace, keep the doorway on the left clear."
Keep the style consistent across photos of the same space so the listing looks cohesive. Batch style can help.
Check exterior results closely. Compare the house, windows, roofline, landscaping and framing with the original before approving an Exterior Sunset result.
Always review before delivering. Check walls, doors, windows, fixtures and flooring against the original photo.
Exterior Sunset: Twilight, Sunset and Night Time
Change an exterior photograph's sky and lighting to create a twilight, sunset or nighttime presentation. Always compare the result with the original before approving it.
Import an exterior photo and click its card.
In the right-hand controls, choose Room → Exterior Sunset.
Choose a Time of day:Twilight, Sunset or Night Time.
Check the photo and click Generate Selected.
Open Review and compare the result with the original.
Check the house, windows, roofline, landscaping and camera framing.
Approve the preferred version, then close Review and export from the main workspace. Use Rebuild this angle if another attempt is needed.
In Exterior Sunset mode, the interior staging controls (Task, Style, Color, Artwork and Instructions) are hidden. Your interior choices are kept if you switch the photo back to another room type.
Exterior Sunset is designed to change only the sky and time-of-day lighting, adding a light fill to the facade, while keeping the house and camera viewpoint the same. That's the intended behavior, not a guarantee. AI results can alter details or produce lighting that isn't physically accurate, so review every result.
Changing the Time of day dropdown doesn't generate an image. Each generation, retry or revision can incur a separate OpenAI charge.
MLS disclosure
Every export asks how the image should be labeled:
Clean image — no added text
No text on the image. Use this when your local rules allow disclosure in the listing remarks or fields. Choosing a clean image doesn't add disclosure to your listing for you.
Add virtual-staging disclosure text
Adds text such as "VIRTUALLY STAGED" to the image. You can change the wording, position and text size, and add a semi-transparent background.
Some states and MLSs require a label on the image itself. California, for example, requires a clear label plus a way for buyers to see the original photo, so add disclosure text there. Requirements vary by MLS, board, brokerage and jurisdiction; check your local rules and keep the unstaged originals on file.
Costs and your plan
OpenAI costs
OpenAI bills image generation directly to your own OpenAI account, separately from your StagingLens subscription. ChatGPT subscriptions don't include API credits. Each generation, retry or revision is another paid image request. Total cost depends on the model, quality, input images and number of attempts.
Changing settings, applying a batch style or approving an existing result doesn't generate an image. Check usage in your OpenAI account and review its billing controls before generating a listing.
Every new subscription starts with a 30-day free trial.Try Free for 30 days from the StagingLens store. A card is required to start, and you'll be charged when the trial ends unless you cancel first.
To cancel, update your card or view invoices, go to your Account page and click Manage subscription. Sign in to Creem with the email address you used at checkout; Creem emails you a secure sign-in link, so there's no separate StagingLens password.
To cancel: in the Creem portal, select your StagingLens subscription, open Manage Subscription, choose Cancel Subscription and confirm.
Founding Member pricing (trial started by December 31, 2026, limited to 30 members per plan: 30 monthly and 30 annual): $5/month or $50/year for as long as the subscription stays active. The regular price is $9/month or $90/year. Cancelling ends Founding Member pricing.
Cancelling stops future charges. You keep access until the end of the period you've paid for.
Uninstalling StagingLens or deactivating a computer does not cancel your subscription. OpenAI API billing is separate and is managed in your OpenAI account.
Paste the whole key, with no spaces before or after it.
A deleted or revoked key won't work. Create a new one.
I copied the key, but nothing happens
Open Settings, expand Connection settings and help, paste the key, click Save Key, then click Test Connection. The key isn't used until it's saved.
Staging is slow, or I see "too many requests"
New OpenAI accounts have lower rate limits, which rise as your account builds usage history.
Wait a minute or two, then try again.
Stage large listings in smaller groups: check fewer photos and use Generate Selected.
A result changed a wall, window or doorway
Don't approve it. Compare it with the original in Review and check the architecture carefully.
Check that the Room and Task are right for the photo.
Click Rebuild this angle for a fresh attempt from the original photo, or use Open edit tools… to correct a specific area. Each attempt is a separate OpenAI charge.
Give it a few moments, then look in the StagingLens Results collection.
Check that Automatically return new approvals… is enabled for this project and the result is approved.
Open Lightroom Classic with the catalog the originals came from.
In File → Plug-in Manager, check that the StagingLens plug-in included with your current download is installed and enabled. Changing the app path alone doesn't update the loaded plug-in.
If the app reports missing original-photo associations, stop retrying the return and contact support. Older sends may lack the information needed to match results safely to their originals.
Include the app version, plug-in version and exact message when using the contact form. A support report can help diagnose the issue.
I see a security warning when opening StagingLens
Only download StagingLens from your receipt email or staginglens.com. If your computer still blocks the app, send us a message through the contact form and we'll help you open it safely.
My license key isn't accepted
Copy the key from your receipt email exactly, with no extra spaces.
Make sure your computer is online. StagingLens checks your license with staginglens.com when you activate and about once a day after that. If the check can't connect, wait a few minutes and try again.
Check that your subscription or trial is still active: go to your Account page and click Manage subscription.
If you've set up a new computer, you may need to deactivate an old one. Use the contact form and we'll help.
Export a support report
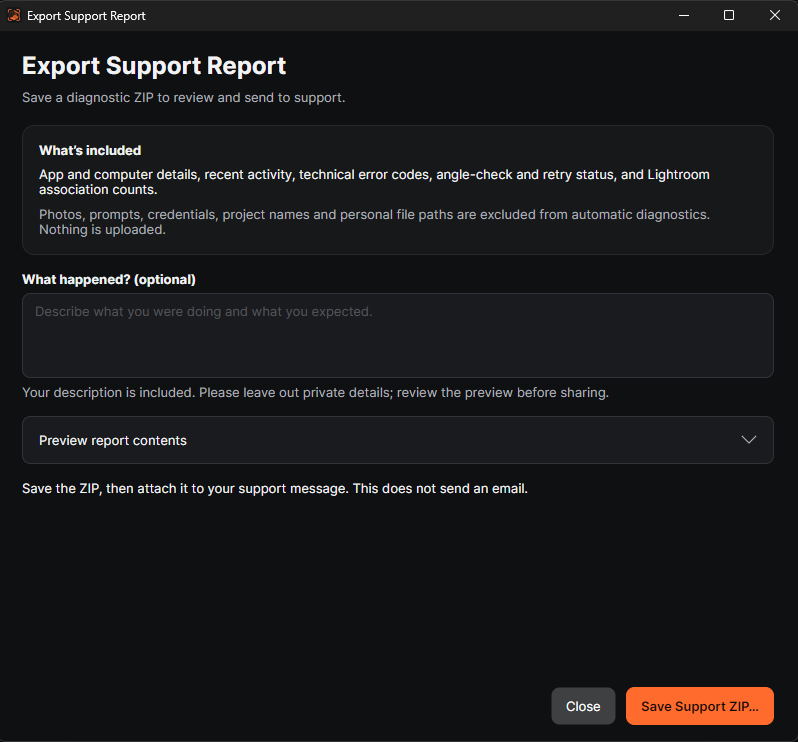
In StagingLens, open the Help menu and choose Export Support Report….
Preview the technical report and review any description you add.
Save it to a file on your computer. Saving doesn't upload or email it.
The technical report excludes photos, prompts and credentials. Review your own description before sharing it and never include API keys, license keys or private photo details.
Beta testers only: you can also send the report through the beta feedback form, using your beta upload code to attach it. Written feedback can be sent without a code or attachment.
Open Preview report contents, review your description and choose Save Support ZIP. Saving does not upload or email the report. View full size
Testing a beta build? You can also use the Beta Feedback page to report a bug, confusing step or suggestion.
Never send your API key or license key.
Quick reminders
Your key usually starts with sk-.
Keep your key private.
You may only see the full key once, when it's created.
ChatGPT Plus and OpenAI API billing are separate.
Common questions
Do I need ChatGPT Plus?
No. StagingLens uses the OpenAI API, which is billed separately from ChatGPT Plus. ChatGPT subscriptions don't include API credits. You need an OpenAI account with API billing set up.
Is my API key safe?
Your key is stored locally on your computer and is only sent to OpenAI. StagingLens never sends it to our servers. Never share it publicly.
Where do my photos go?
Ordinary staging sends photos from your computer directly to OpenAI using your own API key, and the results come back to your computer. We don't receive those photos. We only receive photos or reports you choose to send us for support. See the privacy policy.
Do I need to write prompts?
No. The staging rules are built in. Just choose the Room, Task and Look. Instructions are optional, for one-off requests.
Can StagingLens make twilight exteriors?
Yes. Choose Room → Exterior Sunset, then a Time of day: Twilight, Sunset or Night Time. See Exterior Sunset.
Can I use StagingLens on two computers?
Yes. Paste your OpenAI key on each computer, or create a separate key for each one so you can revoke them individually.
What if my API key is ever exposed?
Delete it at platform.openai.com/api-keys, create a new one, and paste it into StagingLens Settings with Save Key.
How do I cancel or change my subscription?
Go to your Account page and click Manage subscription. Sign in to Creem with your checkout email, select your StagingLens subscription, open Manage Subscription and choose Cancel Subscription. Uninstalling the app doesn't cancel billing.
Can I send photos from Lightroom Classic?
Yes, with the included StagingLens plug-in. Approved results can return to your catalog automatically. See Lightroom Classic round trip. This feature is in testing.
What size are the staged files?
StagingLens exports JPG files. Check the exported image dimensions against your listing platform's requirements.
Need more help?
Open the Help menu in StagingLens, email support@staginglens.com, or send us a message through the contact form. Our support response target is two business days.